Introduction
Raw music video footage rarely tells the full story on its own. Flat exposure, inconsistent white balance between locations, mismatched color temperatures across cuts — these problems quietly undermine even the strongest performance footage. Color grading fixes that, then shapes the emotional temperature of every frame.
There's an important distinction to make upfront. Color correction and color grading are two separate processes: correction fixes technical issues — exposure, white balance, consistency between shots — while grading applies a creative, stylized look on top of that corrected foundation. Music videos demand both, and in that order.
This guide walks through the complete workflow — from primary correction and creative grading to shot matching, export settings, genre-specific approaches, and knowing when to hand the project to a professional colorist.
Key Takeaways
- Always start with color correction before applying any creative grade
- Music videos with 150–350 cuts demand efficient workflows — batch grading saves hours
- Lift, gamma, and gain control the emotional weight of your image more than any LUT
- Secondary grading (masks, qualifiers, Power Windows) separates polished results from amateur ones
- High-stakes projects benefit from professional colorists: calibrated monitors and genre experience make a measurable difference
How to Color Grade a Music Video: Step-by-Step
Step 1: Organize Your Timeline and Set Up Your Project
Before any color work begins, get your project organized. Label clips by scene, location, or camera angle in your NLE — whether that's DaVinci Resolve, Adobe Premiere Pro, or Final Cut Pro. Confirm every file is in the correct color space and that LOG or RAW footage has proper camera LUTs assigned before the correction pass starts.
Music videos commonly have 150–350 cuts depending on genre and tempo. Working clip by clip at that volume isn't practical. DaVinci Resolve's Color page — with its node-based structure and gallery stills — makes it possible to apply and propagate grades efficiently across large shot counts. Premiere Pro's adjustment layers serve a similar purpose for editors already working in that NLE.
Get the structure right before touching a single color wheel — every hour spent organizing saves two during the grade.
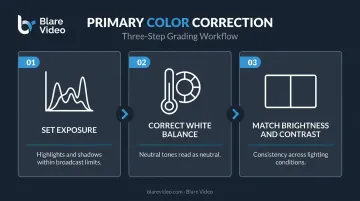
Step 2: Perform Primary Color Correction
Primary correction is technical, not creative. The goal is a consistent, normalized baseline across every clip rather than a finished look.
Use scopes to do this objectively. Adobe's Lumetri Scopes include the Waveform, Vectorscope, Histogram, and Parade — these tools measure the actual signal rather than relying on perception. Use them to:
- Set exposure so highlights and shadows sit within legal broadcast limits
- Correct white balance so neutral tones read as neutral
- Match brightness and contrast levels across clips shot in different lighting conditions
A creative grade built on technically inconsistent footage will look uneven across cuts. In a fast-paced music video edit, that inconsistency becomes obvious immediately.
Step 3: Apply Your Creative Color Grade
With a clean, corrected foundation, the creative grade can begin. This is where the visual identity takes shape.
Blackmagic Design describes the primary color wheels — lift, gamma, and gain — as tools that adjust balance and brightness across overlapping tonal ranges: shadows, midtones, and highlights respectively. Pushing the lift toward cool tones while warming the gamma creates a contrasted, cinematic look. Boosting gain while keeping lift low generates a high-contrast, punchy image.
On LUTs: A LUT functions as a color preset, a starting point rather than a finished grade. There are two types worth understanding:
- Technical LUTs (also called Input or Camera LUTs): convert LOG footage to a viewable standard like Rec. 709
- Creative LUTs: apply a stylized look such as film stock emulation or bleach bypass
Always apply the correct technical LUT first when working with LOG footage. Then use a creative LUT as a starting point, dialing it back and refining with additional nodes or adjustment layers. At full strength, most LUTs look unnatural. Treat them as a foundation to build from, not a final answer.
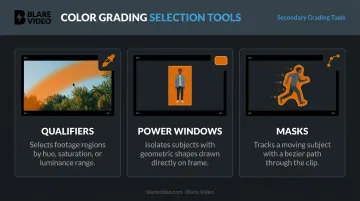
Step 4: Use Secondary Grading for Selective Adjustments
Secondary grading is where amateur and professional results diverge most visibly.
Blackmagic describes secondary grading as selecting a specific area of the image for isolated correction, changing a color in one part of the frame without affecting the rest. The key tools are:
- Qualifiers: select areas by hue, saturation, or luminance
- Power Windows: shape-based selections around specific objects or regions
- Masks (in Premiere Pro): isolate adjustment to a tracked area
In music video work, the most critical application is skin tone protection. A creative grade that pushes teal shadows and desaturated backgrounds looks strong right up until skin tones start reading green or purple. Isolate skin tones using a qualifier or mask, keep them warm and natural, and push the creative look everywhere else.
Cinematographer Larkin Seiple, discussing Childish Gambino's This Is America, specifically cited maintaining rich, accurate skin tones across varying exposure conditions as a top priority. That principle applies to any music video production regardless of genre or aesthetic.
Step 5: Match Shots, Check Consistency, and Export
The final pass before export is the shot-matching review. Compare every cut against a hero reference frame — a well-graded clip that represents the intended look. Check for:
- Brightness and contrast consistency between matching angles
- Color tone continuity across location changes
- Consistent saturation levels throughout
For delivery, platform specs matter. Export a high-quality master first, then compress for each platform separately:
- YouTube: MP4 with H.264 encoding, BT.709 color space
- Vimeo: H.264, Apple ProRes 422 HQ, or H.265; BT.709 or BT.2020 color metadata recommended
Check the final output on a calibrated monitor. Consumer displays can make a grade look dramatically different from what it actually is.
Key Color Grading Parameters That Shape the Final Look
Small changes to these variables shift the entire emotional register of a video. Knowing what each one controls makes grading intentional rather than accidental.
Exposure and Contrast (Lift/Gamma/Gain)
Lift controls shadow depth, gamma shapes midtone brightness, and gain drives highlight intensity. Together they determine whether a video reads as moody and heavy or bright and open.
Low lift (deep, crushed shadows) combined with high gain (bright highlights) creates the high-contrast, cinematic look common in narrative-driven music video work.
The risk with aggressive contrast is clipping — losing detail in faces and backgrounds that can't be recovered. Monitor the histogram and parade scope continuously to keep key image areas in workable range.
Color Temperature and Saturation
Warm grades communicate intimacy, energy, and nostalgia. Cool grades suggest tension, distance, or something clinical. These are intentional creative pushes made in the grade — separate from whatever correction pass established neutral tones.
Saturation operates on two levels:
- Global saturation: affects all colors equally — heavy desaturation creates a gritty, stripped-back feel
- Targeted vibrancy: boosts specific hue ranges while leaving others alone — useful for making certain colors pop without blowing out others
Check the vectorscope when pushing saturation. It shows where colors are landing and whether low-light areas are developing noise or color artifacts from excessive saturation increases.
Once temperature and saturation are dialed in, LUT selection determines how all of that tonal work is packaged into a final look.
LUT Selection and Intensity
Match the LUT to your shooting format — a LUT built for one camera's LOG profile will produce incorrect results on another. Once the right technical LUT is applied, add a creative LUT as a layer above it and treat it as a starting point. Layer manual adjustments on top using nodes (in Resolve) or additional effects (in Premiere) to personalize the look and account for the specific footage.
A LUT that looks close to the desired result at full strength usually looks unnatural on skin tones and in shadow areas. Pull it back and use it as a direction, not a destination.
Color Grade Styles for Different Music Video Genres
Genre aesthetics in music videos carry real audience expectations. The visual look contributes to how a song is perceived — a mismatch between grade and genre creates friction even when viewers can't identify exactly why something feels off.
That said, genre-wide rules are easier to oversimplify than apply. The most practical approach is referencing successful videos within the specific genre before starting a grade. Build a reference reel with the artist early in the process — it saves hours of back-and-forth time during the grade session and aligns expectations before any creative decisions are made.
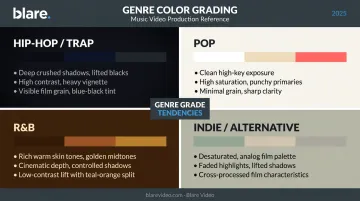
Some general tendencies worth knowing:
- Hip-hop and trap: often feature deep shadows, high contrast, and grain — a cinematic, street-level aesthetic
- Pop: trends toward clean, bright, high-saturation grades with minimal grain
- R&B: typically favors warm, rich skin tones with cinematic depth and controlled shadows
- Indie and alternative: frequently uses muted, desaturated palettes with analog film characteristics
These are tendencies, not rules. Childish Gambino's This Is America is a clear example: the video moves between warm, inviting light and deeply shadowed darkness within the same grade, using color as a narrative device that shifts with the song's emotional arc.
Professional colorists also use grade variation within a video's structure intentionally — applying a different treatment to the chorus versus the verses, or using a color effect as a punctuation point when the music drops. When color moves with the music rather than sitting still underneath it, the grade becomes part of the performance.
Common Mistakes When Color Grading a Music Video
Skipping the correction pass. Jumping straight into a creative grade on uncorrected footage makes it nearly impossible to apply a consistent look across varying lighting conditions. The grade will fight the footage rather than enhance it.
Over-grading. The visible signs are hard to miss: blacks with no shadow detail, skin tones that glow orange, highlights that clip instead of roll. The most common mistake isn't doing too little — it's pushing every parameter past the point of return. Pull back before you think you need to, especially in your first pass.
Skipping the shot-matching pass. In a fast-paced music video edit, jarring color shifts between consecutive cuts are immediately noticeable — even to viewers with no color theory background. Skip this step and the grade reads as a series of disconnected treatments instead of a cohesive visual language.
DIY Color Grading vs. Hiring a Professional Colorist
When DIY Makes Sense
- Lower-budget projects with simple, consistent lighting throughout
- Single-location shoots with minimal exposure variation
- Editors already proficient with DaVinci Resolve or Premiere's Lumetri Color
- Videos where a straightforward, single-look grade covers the whole piece
DaVinci Resolve is free and fully capable of professional-quality results. The limiting factor is experience with scopes, color theory, and format-specific workflows — not the software itself.
When to Bring in a Professional
- Multi-location shoots with significant exposure and lighting variation
- High-profile releases where the visual look is central to the artist's brand identity
- Large shot counts with tight turnaround deadlines
- Any project where skin tone accuracy and secondary grading are critical
Professional colorists work on calibrated monitors, bring genre familiarity developed across many projects, and operate with established workflows that handle high cut counts efficiently. That experience typically means fewer revision rounds and tighter turnaround on complex grades.

For production teams who want support from pre-production through final grade, working with a full-service company like Blare Video means color grading decisions get built into the shoot plan — not retrofitted after the fact. Shooting in the right format, with the right lighting and resolution, is what gives a colorist meaningful latitude in post. Blare Video operates across major US markets with crews in cities including Los Angeles, New York, Chicago, and Dallas.
Frequently Asked Questions
How much does color grading a music video cost?
Pricing depends on cut count, video length, colorist experience, revision rounds, and whether grading is part of a full production package. Blare Video's standalone post-production packages for music videos start around $2,800 for standard color correction and $4,050 for DaVinci color correction; full production packages that include grading start at approximately $6,000.
Is color grading necessary for a music video?
For any video intended for professional distribution, color grading is effectively essential. Raw footage lacks the visual consistency and emotional tone audiences expect. It's what transforms camera output into a finished, polished product.
Can you color grade a music video yourself?
Yes. DaVinci Resolve is free and capable of professional-quality results, though a polished grade requires practice with scopes, a grasp of color theory, and familiarity with your shooting format, especially LOG footage.
What software is best for color grading a music video?
DaVinci Resolve is the industry standard for music video work, with a node-based workflow, professional scopes, and Power Windows built in. Adobe Premiere Pro's Lumetri Color suits editors who prefer to stay within a single NLE without round-tripping to a dedicated grading app.
What is the difference between color correction and color grading?
Color correction normalizes footage — fixing exposure, white balance, and shot-to-shot consistency so everything looks technically accurate. Color grading applies a creative, stylized look on top of that corrected foundation to establish mood and visual identity.
How long does it take to color grade a music video?
Professional colorists typically spend 4–6 hours on a standard music video grade, depending on shot count and complexity. DIY grading on a comparable project takes longer without an established workflow and efficient toolset.