These failures aren't random. They come from skipping steps that seem optional but aren't: proper bandwidth testing, encoder configuration, signal chain verification, and dress rehearsals. The virtual events market is projected to reach $297.16 billion by 2030, which means audiences now expect professional broadcast quality — not a shaky webcam feed.
Small webinars with a technically capable host can be self-managed. Multi-camera conference streams with stage production, multiple speakers, and a live remote audience are a different problem entirely. This guide covers both scenarios, with the steps and checks that separate a clean broadcast from a damaging failure.
Key Takeaways
- Live streaming requires a camera, microphone, encoder, streaming platform, and a tested, dedicated upload connection — configured before event day
- Webinar platforms (Zoom, Webex, Teams) suit interactive events; broadcast platforms (YouTube Live, LinkedIn Live) suit large, public-facing conferences
- A dress rehearsal 24–48 hours in advance is where most technical failures get caught and fixed
- The three biggest risks: poor audio, insufficient upload bandwidth, and encoder misconfiguration — all preventable
- High-stakes events need a professional production crew with redundant systems — one failure point shouldn't take down your entire stream
Setting Up Live Streaming for Conferences and Webinars
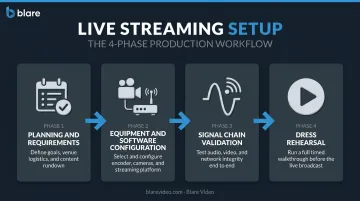
Setup broadly follows four phases:
- Planning and requirements confirmation — run of show, platform selection, bandwidth verification
- Equipment and software configuration — encoder setup, camera positioning, audio testing
- Full signal chain validation — private test stream, health dashboard check, recording confirmation
- Dress rehearsal — complete run-through with all speakers, same equipment, same network
A basic single-camera webinar can be configured in a few hours. A multi-camera conference stream with stage switching, multiple audio sources, and a live audience requires a full day of setup minimum, often a dedicated setup day the day before.
Prerequisites and Connectivity Requirements
Confirm venue infrastructure before ordering or shipping any equipment. Getting on-site and discovering the network can't support your stream is a crisis with no good solution.
What to verify in advance:
- Dedicated wired Ethernet — not shared guest Wi-Fi. Hotel and conference center Wi-Fi is shared, congested, and unsuitable for live streaming
- Upload speed — LinkedIn Live requires at least 10 Mbps upload before starting a stream; YouTube recommends 10 Mbps for 1080p at 30fps and 12 Mbps for 1080p at 60fps
- Firewall and port access — RTMP typically runs on port 1935; RTMPS (encrypted) runs on port 443. Venue IT firewalls sometimes block both, so confirm before show day
- Platform and encoder compatibility — mismatched codecs and unsupported configurations cause a surprising number of pre-event failures
Non-negotiables before proceeding:
- Do not go forward without a confirmed backup internet source: LTE failover, a cellular bonded connection, or a secondary wired line from a different circuit
- Do not assume a venue's "high-speed" connection is adequate — test it with a speed test tool under realistic load conditions
- If the venue's network policy blocks RTMP/RTMPS traffic, escalate to IT immediately. This is not a day-of fix
Essential Equipment for Live Streaming
Camera
For webinars, a quality webcam or a DSLR connected via capture card is sufficient. For conferences with a stage:
- Minimum two camera angles: wide shot (full stage) and close-up (speaker)
- Broadcast-grade cameras provide noticeably better image quality under variable lighting conditions
- Blare Video's conference production packages include cameras ranging from Sony FS5/FS7 to RED Epic Dragon systems for 4K output
Audio
Audio quality matters more than video quality to your audience. A buffered stream is annoying. Unintelligible audio ends the experience entirely.
- Lapel microphones for individual speakers — provides consistent, close-source audio regardless of speaker movement
- Handheld or podium mics for Q&A segments
- Dedicated audio mixer or interface for multi-mic setups — essential for controlling levels and preventing feedback
Encoder
The encoder processes all video and audio signals and pushes the stream to the platform. Two options:
| Type | Examples | Best For |
|---|---|---|
| Software encoder | OBS Studio (free, open source) | Small webinars, budget-conscious setups |
| Hardware encoder | Teradek, Haivision, ATEM-based systems | Corporate conferences, high-stakes events |
OBS recommends hardware encoding over software encoding (x264) for best performance, as it offloads processing from the CPU. For corporate conferences, hardware encoders are the professional-grade choice, more stable under sustained load.
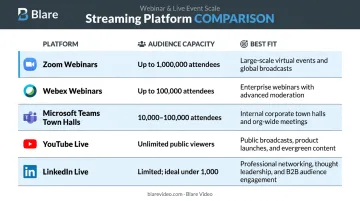
Streaming Platform
| Platform | Capacity | Best Fit |
|---|---|---|
| Zoom Webinars | Up to 1 million attendees | Large managed webinars |
| Webex Webinars | Up to 100,000 attendees | Enterprise webinars |
| Microsoft Teams town halls | 10,000–100,000 attendees | Internal corporate broadcasts |
| YouTube Live / LinkedIn Live | Large public audiences | Public-facing conferences, brand broadcasts |
Supporting gear rounds out a complete setup:
- Softbox or LED key lighting for on-camera presenters
- Capture cards for HDMI camera sources
- External monitor so the operator can see the outgoing stream in real time
- Production switcher for multi-camera events
How to Set Up Live Streaming Step by Step
Step 1 — Plan the run of show
Document every segment, speaker slot, transition, and break before touching any equipment. This becomes the production team's anchor during the live event. Include timing for pre-roll content, slide transitions, and Q&A windows.
Step 2 — Configure the encoder and platform
- Create the live event on your chosen streaming platform
- Copy the stream key and RTMP/RTMPS server address
- Enter both into your encoder software or hardware
- Set resolution and bitrate per platform specifications:
- 720p/30fps: 3.5 Mbps video bitrate (LinkedIn recommended)
- 1080p/30fps: 10 Mbps H.264 (YouTube)
- 1080p/60fps: 12 Mbps H.264 (YouTube)
- Set keyframe interval to 2 seconds — most platforms require this
- Confirm the output signal is clean on a private test stream before event day
Step 3 — Set up cameras, lighting, and audio
- Run and secure all cables (tripping hazards become disasters during live events)
- Position cameras for planned shot angles
- Place and test microphones on all speakers — check for feedback and clipping
- Set lighting so presenters are evenly lit without harsh shadows or overexposure
- Conduct an audio levels check with someone speaking at presentation volume, not a quiet test tone
Step 4 — Test the full signal chain end to end
- Start a private or unlisted test stream
- Verify video and audio are reaching the platform cleanly
- Check the stream health dashboard for dropped frames or bitrate fluctuations
- Confirm local recording is enabled — your insurance policy if the live stream experiences issues
Step 5 — Brief all participants
- Tell speakers where to look on camera and who to flag if something goes wrong
- Walk them through audience interaction features: polls, Q&A, and chat
- Assign a dedicated chat moderator. The technical operator cannot manage audience interaction and monitor stream health at the same time
Pre-Event Checks and Rehearsal
Run a full dress rehearsal at least 24 hours before the event. Use the same equipment, the same network connection, and the same room, not a different laptop at home.
What to run through in rehearsal:
- Complete run of show, including all transitions
- Screen shares and slide capture (confirm they appear correctly in the stream, not just on the presenter's monitor)
- Pre-recorded video segments and their audio routing
- Platform graphics, lower thirds, or any custom overlays
On the day of the event:
- Arrive 90 minutes early minimum
- Re-verify upload speed and encoder connection
- Confirm the backup internet connection is active and ready to switch instantly
- Do a brief audio check with each speaker before doors open
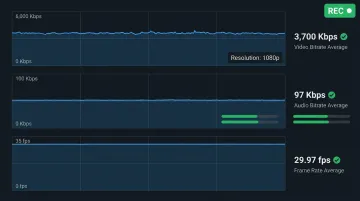
Signs your stream is correctly configured:
- Stable bitrate on the platform's stream health dashboard (no spikes or drops)
- Clean audio levels without clipping
- Video resolution matching the configured encoder output
- Test recording playback confirms both audio and video tracks are captured correctly
Common Live Streaming Problems and How to Fix Them
Audio Dropouts or Echo During the Stream
Problem: Viewers report no audio, distorted audio, or echo.
Likely cause: The wrong audio input device is selected in the encoder, or a monitor speaker is being picked up by an open microphone, creating a feedback loop.
Fix: Confirm the correct audio input is selected in encoder settings before going live. Mute all monitor speakers when microphones are open. Use a dedicated audio interface to manage gain levels independently from the encoder.
Stream Dropping or Heavy Buffering
Problem: Stream stalls, pixelates severely, or disconnects mid-broadcast.
Root cause: Upload bandwidth is insufficient or unstable — shared Wi-Fi, a congested venue network, or a bitrate setting set higher than the available upload speed can sustain.
Fix: Switch to wired Ethernet if not already using it. Reduce encoder output bitrate to match confirmed upload speed. Activate the LTE or cellular backup connection and restart the stream from the encoder.
Encoder Failing to Connect to the Platform
Problem: Encoder shows "connecting" indefinitely or returns a stream key authentication error.
What's happening: Incorrect RTMP server URL or stream key, or the venue firewall is blocking the streaming port.
Fix: Verify the stream key and RTMP URL directly against the platform's live event settings page — copy-paste errors are common. If firewall is blocking traffic, work with venue IT to open the required ports (port 1935 for RTMP, port 443 for RTMPS). A mobile hotspot bypasses venue network restrictions entirely and is worth having as a fallback.
Pro Tips for a Professional Live Stream
No equipment upgrade compensates for a dropped connection. Internet redundancy is the first investment to make: always have a secondary source (4G/5G cellular backup or a second wired line from a different ISP) ready to activate instantly. Bonded cellular solutions combine multiple connections for improved reliability and throughput — which is why production teams rely on them at hotels and conference centers where venue networks are unpredictable.
Always configure the encoder to save a local recording to a hard drive simultaneously with the outgoing stream. If the live connection drops, the clean file still exists. That footage also has a long shelf life: ON24's research shows making recordings available on demand can increase total views by up to 80%, making it useful for replays, training content, and post-event highlights.
For corporate conferences and product launches, a professional production crew removes most of the risk from this checklist. Blare Video's event streaming setups typically include:
- Multi-camera configurations with ATEM-based hardware switching
- Dedicated audio capture via lapel mics and direct sound desk feeds
- Bonded cellular connectivity for venue-independent reliability
- On-site technical directors managing the stream in real time
- Simultaneous local recording as a fallback
The practical difference between a self-run stream and a professionally produced one is having someone on-site who has already encountered these problems and knows the fix before the event goes sideways.
Conclusion
Live streaming quality is determined almost entirely before the event starts. When a broadcast fails, it's almost always a preparation problem — one that a checklist and a rehearsal would have caught.
Treat the technical setup with the same rigor as the content agenda. That means:
- Confirming infrastructure and internet capacity well before event day
- Testing the full signal chain end-to-end, not just individual components
- Running a complete dress rehearsal with all participants
- Documenting your backup plan so anyone on the crew can execute it
Do those things, and the broadcast itself is rarely where problems happen.
Frequently Asked Questions
What does live streaming a conference or webinar mean?
Live streaming means broadcasting video and audio of your event over the internet in real time, allowing remote attendees to watch as it happens from any location. No physical attendance is required, and viewers access the stream via a platform link on any internet-connected device.
How much does it cost to live stream a conference or webinar?
Costs vary based on scope. A DIY webinar setup using a webcam, USB microphone, and a platform subscription can start under a few hundred dollars. A professionally produced multi-camera conference stream with crew, hardware encoders, and redundant connectivity is priced per project — contact a production company for a custom estimate for your event.
What internet speed do I need for live streaming a conference?
Upload speed is the critical metric. A 1080p stream at 30fps requires a minimum of 10 Mbps upload — LinkedIn Live specifies this explicitly. A dedicated wired Ethernet connection is strongly preferred over shared Wi-Fi, which is too unpredictable for a live broadcast.
Do I need professional equipment to live stream a webinar?
Small webinars can run effectively with a quality webcam, USB microphone, and a laptop. Professional conferences benefit substantially from HD cameras, a dedicated audio mixer, hardware encoders, and production switching — the difference in output quality and reliability is significant.
Can I live stream to multiple platforms at the same time?
Yes. Simulcasting lets you broadcast to multiple destinations simultaneously. Vimeo supports up to 10 integrated destinations and 20 custom RTMP destinations per event. Third-party tools like Restream support multistreaming to 30+ platforms and work with OBS, Zoom, and other common production tools.
Should I hire a professional live streaming service or set it up myself?
DIY works for small, lower-stakes webinars with a technically capable host. For large conferences or any event where brand reputation is on the line, a professional live streaming service reduces risk and delivers broadcast-quality output, especially when something unexpected happens mid-stream.