The technical stakes are real. TechSmith's 2024 Video Viewer Trends Report found that 9% of viewers stop watching because of poor quality, and poor audio ranks as one of the top deal-breakers. Meanwhile, McKinsey's live commerce research shows live video can reach conversion rates up to 10x higher than conventional e-commerce — meaning a well-executed stream isn't just a content play, it's a sales channel.
This guide covers every layer of a live streaming setup for a product launch: pre-event planning, equipment selection, platform configuration, step-by-step setup, and what to do when something goes wrong mid-broadcast.
Key Takeaways
- Five components make or break a product launch stream: camera, external audio, lighting, encoder software or hardware, and upload bandwidth
- Platform choice should follow your audience — LinkedIn for B2B, YouTube or Instagram for consumer products
- Run a full dress rehearsal 24–48 hours before launch to catch signal failures before they happen live
- Audio quality matters as much as video — bad sound loses viewers even when the picture looks great
- For high-visibility launches where brand credibility is on the line, a professional production crew is the lower-risk option
Planning Your Live Stream Around Your Product Launch Goals
Before touching any gear, define what the stream needs to accomplish. That single decision shapes every equipment and platform choice that follows.
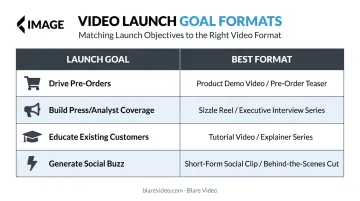
Common launch objectives and matching formats:
| Goal | Best Format |
|---|---|
| Drive pre-orders | Live demo + product reveal with CTA overlay |
| Build press/analyst coverage | Keynote reveal with Q&A |
| Educate existing customers | Feature walkthrough + live Q&A |
| Generate social buzz | Short, punchy reveal with interactive polls |
Audience and Platform Fit
Stream where your buyers already spend time — not where the setup is most convenient.
- LinkedIn Live: B2B buyers, enterprise decision-makers, investor-facing reveals. LinkedIn Live generates 7x more reactions and 24x more comments than native video on the platform. Salesforce reached 600,000+ organic viewers with a 3% engagement rate through LinkedIn Live alone.
- YouTube Live: Consumer and mixed audiences. Best for search discoverability and long-term replay value.
- Instagram Live: Consumer brand reveals, creator-brand moments, social-first product drops.
- Facebook Live: B2C community launches, social commerce events.
Confirm platform eligibility at least one week before launch — access requirements catch teams off guard. LinkedIn requires 150+ followers, an account at least 30 days old, and a third-party broadcast tool. YouTube requires channel verification and no live-streaming restrictions in the past 90 days. Facebook requires an account at least 60 days old and 100+ followers for Pages.
Assign Roles Before Setup Begins
Live broadcasts move fast. Assign these roles before setup begins:
- Stream director — calls scene transitions and pacing
- Camera operator(s) — one per camera angle
- Audio lead — monitors levels throughout the broadcast
- Platform monitor — watches stream health, chat, and platform status
- Chat moderator — surfaces audience questions for the presenter
Equipment Checklist for a Product Launch Live Stream
Camera
The right camera depends on what the launch needs to look like on screen.
- Smartphone or webcam: Acceptable only for small internal announcements or informal product updates
- Mirrorless/DSLR with clean HDMI out: The minimum for any corporate launch where brand presentation matters (manual exposure control is non-negotiable)
- Professional cinema cameras: For high-stakes reveals, broadcast-grade cameras with controlled depth of field make the product look the way it deserves to look
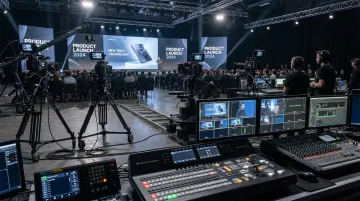
For multi-camera product launch productions, Blare Video deploys cinema-grade rigs including Sony FS5, FS7, Canon C300, and RED Epic/Weapon systems, paired with ATEM Television Studio Pro HD and 4K switchers for live camera switching. These setups go well beyond what a laptop webcam workflow can deliver.
Microphone and Audio
Poor audio kills viewer retention faster than poor video. Built-in camera microphones are not acceptable for a product launch — skip them entirely.
Choose based on your setup:
- Lavalier/lapel mic: Best for a single presenter moving around a stage
- Shotgun mic: Works for stage setups with a fixed presenter position
- Direct PA/mixer board feed: Ideal when the venue has a professional sound system; tap in directly rather than mic-ing the room
If you're using multiple mics or connecting to a venue sound system, you need an audio interface or mixer in the signal chain. The RODECaster Pro II (4 balanced inputs, 76dB preamp gain) and Allen & Heath ZEDi-10FX (4-in/4-out, 24-bit/96kHz USB) are solid examples of production-grade options.
Lighting
A product launch needs to make the product look its best. Overhead or flat lighting creates unflattering shadows on both the presenter and the product itself.
Three-point lighting for the presenter:
- Key light — primary illumination, positioned at 45 degrees
- Fill light — softens shadows from the key light
- Back/hair light — separates the subject from the background
For physical product reveals, add a dedicated spotlight or product table light. The product shot needs its own lighting treatment; presenter lighting alone won't do it justice.
Encoder and Streaming Software
The encoder converts your camera and audio signals into a format the platform can receive. Two categories:
Software encoders (OBS Studio, vMix, Streamlabs):
- Run on a laptop or workstation
- Flexible, handling scene switching, branded overlays, graphics
- Share resources with the host computer, so CPU load matters
Hardware encoders (Teradek Prism, Magewell Ultra Encode):
- Dedicated processing chips, no shared resources
- Significantly more reliable for high-stakes events
- Teradek Prism supports 4K HDR with RTMP(S), SRT, and RIST, making it purpose-built for mission-critical streams
vMix is the preferred software option for multi-camera switching with live graphics on corporate launches. When it's an executive reveal or press event, a hardware encoder is worth the investment — it removes the failure risk that shared-CPU software workflows carry.
Supporting Hardware
Don't overlook these. Missing any one item during a live launch creates a bottleneck with no on-the-fly fix:
- Capture cards (connects HDMI cameras to a laptop; the Magewell USB Capture HDMI handles this reliably)
- Video switcher (for multi-camera live switching)
- Dedicated streaming laptop with sufficient CPU and RAM (vMix recommends at minimum a Quad Core 3.4GHz CPU with NVIDIA GTX 1050 or higher for basic HD)
- Secondary monitor for stream preview
- Wired ethernet connection(Wi-Fi is not reliable enough for a live broadcast)
- Cables and redundant backups for every signal path
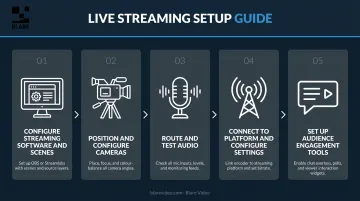
How to Set Up Your Live Stream: Step-by-Step
Getting the order right prevents the most common launch-day failures. Configure software first, test everything before branding goes live, and never skip the private test stream.
Step 1 — Configure your streaming software and scene layouts
Build distinct scenes for each segment: holding screen, presenter intro, product demo shot, Q&A layout, and outro. Set up branded lower thirds with product name and tagline, test all scene transitions, and confirm visual assets are sized correctly for your destination platform.
Step 2 — Position and configure your cameras
A product launch needs at minimum two angles: a wide shot of the stage or presenter, and a tight shot of the product itself. Lock static cameras on tripods. White balance all cameras to the venue lighting. Verify every signal is reaching the encoder cleanly via HDMI or capture card before moving on.
Step 3 — Route and test all audio
Run a full audio check through the encoder and listen for hum, feedback, or sync issues. If tapping into a venue board, confirm signal levels with the sound engineer first. Then:
- Confirm audio levels are consistent in the streaming software
- Assign one dedicated person to monitor audio for the entire broadcast
Step 4 — Connect to the streaming platform and configure stream settings
Input the stream key, set output resolution (typically 1080p at 4,500–6,000 Kbps for most platforms), and confirm the encoder settings match the platform's recommendations. Run a private or unlisted test stream and verify the signal is clean before the launch window opens. Save the stream key in two places.
Step 5 — Set up audience engagement tools
Before going live, complete these four items:
- Configure live chat moderation settings
- Load Q&A prompts or polls ready for deployment
- Brief the moderator on how to surface audience questions
- Confirm all product links, landing page URLs, and CTAs in the stream description are live and tracking correctly
Pre-Stream Testing and Validation
Run a Full Dress Rehearsal
Not a signal test — a complete run-through, including all scene transitions, presenter cues, the product reveal moment, and a simulated Q&A. Record it. Review the footage specifically for:
- Framing and shot composition
- Audio levels and consistency
- Lighting inconsistencies or shadows on the product
- Graphic sizing and lower third errors
Vimeo recommends locking format, links, and visuals at least 24 hours before the event. Professional production teams typically schedule the full technical rehearsal the day before broadcast — not the morning of.
Monitor Stream Health Metrics
Use the rehearsal stream to baseline your technical health. Watch for:
- Dropped frames rate: Should be near zero. Above 1% signals a problem.
- Bitrate stability: Should hold steady at your target output. Fluctuations indicate bandwidth or CPU issues.
- CPU load: Brightcove recommends keeping encoder CPU below 80% to avoid skipped frames.
If values are unstable: lower output bitrate, reduce scene complexity, close all background applications.
Establish Contingency Protocols Before Going Live
Assign decision-making authority for the most likely failure scenarios:
- Internet drops: Activate bonded cellular backup immediately — Blare Video builds bonded cellular backup into standard live event productions for exactly this scenario
- Camera failure: Designate a single-camera fallback angle in advance
- Presenter audio cuts: Have a backup lapel pre-configured and within reach
Pre-assigned roles mean your crew executes without hesitation — the broadcast stays on track regardless of what fails.
Common Live Streaming Problems and Fixes
Even well-planned streams hit technical snags. Here are the three most common issues and how to resolve them fast.
Buffering and Stream Quality Degradation
Pixelation, freezing, or viewer drop-outs typically point to one of three culprits: upload bandwidth exceeded, CPU overload, or venue network congestion.
Fix steps, in order of impact:
- Switch from Wi-Fi to wired ethernet immediately
- Reduce output bitrate in your streaming software
- Close all background applications to free CPU headroom
- Activate a cellular bonding device if venue bandwidth is unreliable
For a 4,500–6,000 Kbps stream, your available upload should be at least 9–12 Mbps — the 1.5x–2x headroom rule recommended by Epiphan and Vimeo, respectively.
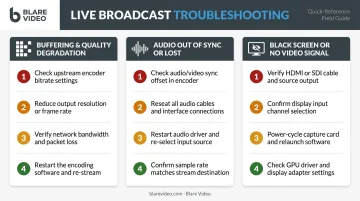
Audio Out of Sync or Lost
Sync drift usually traces back to audio interface latency, a loose cable, or a misconfigured buffer setting in the encoder. Full dropouts are almost always a physical connection issue.
- Use the audio sync offset control in your streaming software to correct drift
- Check all cable connections before adjusting any software settings
- Confirm the correct audio input is still selected and active in the encoder
- Keep a backup microphone pre-configured — you should be able to swap in under 30 seconds
Black Screen or No Video Signal on Platform
When the encoder shows a clean camera feed but the platform preview shows black or "no signal," the cause is almost always one of three things: a wrong stream key, an HDMI output set to the wrong resolution, or a capture card driver that needs a restart.
- Verify the stream key matches exactly what's shown in the platform dashboard
- Cycle the camera's HDMI output resolution to reset the signal
- Restart the capture card software
- Check your keyframe interval — YouTube requires it set to 2 seconds, and an incorrect value is one of the platform's most commonly flagged encoder errors
Pro Tips for a High-Impact Product Launch Live Stream
Frame everything for the camera first. The product reveal, demo, and Q&A should all be staged for the remote viewer — dedicated shot composition for close-ups, presenter eye lines directed at the lens, and lower thirds that give context to viewers who joined mid-stream.
Start promoting two weeks out, not two days. ON24's research shows 50% of registrations happen in the week of or day of an event, so the final stretch is where effort compounds. Use a mix of:
- Email sequences with a countdown
- Teaser clips on social channels
- Calendar invites sent at registration
- Day-of reminder messages
Plan your replay strategy before you go live. ON24's 2025 benchmarks found that on-demand availability can increase total views by up to 80%. The recording doesn't expire when the stream ends — it becomes a highlight reel, social clips, a product landing page asset, and press distribution material. Blare Video offers highlight reel production and social clip cutting as part of their event packages, so the launch keeps generating value after the broadcast window closes.
For high-stakes launches — PR moments, investor reveals, major consumer introductions — a DIY setup carries real reputational risk. A professional crew brings redundant equipment, experienced operators, and contingency protocols that a first-time streaming team can't replicate under live pressure.
Conclusion
The quality of a product launch livestream directly affects first impressions of the product itself. Technical failures, poor audio, and weak visuals reflect on the brand — not just the production crew. A well-executed stream builds immediate excitement, generates engagement during the broadcast, and creates marketing assets that work for months afterward.
Approach the setup with the same rigor you'd apply to any other brand touchpoint. Plan early, test thoroughly, and assign clear roles before the day of the event. Be honest about whether the scale of the launch calls for professional production support — because the cost of getting it wrong is measured in brand credibility, not just production budget. A team like Blare Video, which specializes in corporate event coverage and live production, can fill that gap when the stakes are high.
Frequently Asked Questions
What equipment is needed to live stream an event?
Five core components cover most setups:
- Camera (mirrorless to cinema grade, depending on scale)
- External microphone
- Proper lighting
- Encoding software or hardware (OBS, vMix, or a hardware encoder)
- Stable high-upload internet connection
Product launches typically warrant higher-quality gear than a casual stream — the product needs to look its best on camera.
How much does a live streaming setup cost?
DIY setups can start at a few hundred dollars for basic gear and free software like OBS. Professional multi-camera production with a dedicated crew runs into the thousands, depending on camera count, crew size, and production scope. Cost should be weighed against the brand value of the launch being streamed — not just the production budget.
What are the top live streaming platforms?
The most widely used options include YouTube Live, LinkedIn Live, Facebook Live, Vimeo, StreamYard, and Restream. For product launches, platform choice should be driven by where your target audience already spends time — not which platform is easiest to set up.
What are the best practices for live streaming?
Run a full dress rehearsal with all systems active — never test for the first time on launch day. Always use external audio (built-in mics are not acceptable for brand-level production), and ensure your upload bandwidth exceeds your bitrate requirements by at least 1.5x. Assign dedicated roles before going live, and start the broadcast a few minutes early with a holding screen so latecomers have context.
Do I need a professional production crew for a product launch live stream?
For small internal launches, a capable in-house team can manage a basic setup. For high-visibility consumer or enterprise launches where brand credibility is on the line, a professional crew provides equipment redundancy, technical expertise, and production quality that a DIY setup cannot reliably deliver in a one-take live environment.
How do I keep my online audience engaged during a live product launch stream?
Build Q&A segments, polls, and live-exclusive announcements directly into the run-of-show — don't improvise them on the day. A dedicated chat moderator surfaces audience questions in real time, keeping the presenter connected to remote viewers. Exclusive reveals or limited offers give people a concrete reason to attend live rather than catch the replay.