Introduction
Shooting 360 footage has never been more accessible — but post-production is where most projects break down. Many video producers and marketing teams commission a 360 shoot only to discover that raw spherical footage looks nothing like a finished, watchable video. The files are fragmented across multiple lenses, the projection format is unfamiliar, and standard editing conventions simply don't apply.
This guide is written for video producers, marketing teams, event organizers, and corporate clients — whether you're handling 360 post-production in-house or evaluating what's involved before commissioning professional work.
The stages covered here apply across camera systems and platforms: corporate event videos, real estate walkthroughs, and branded VR experiences all follow the same core process.
The workflow runs from raw file management through stitching, editing, spatial audio, nadir patching, and final export. Each stage is covered here in sequence — because a stitching error caught in post costs an afternoon to fix, while the same error discovered after color grading can cost the entire edit.
Key Takeaways
- 360 post-production starts with stitching — multi-lens footage must be merged into a single equirectangular file before any editing can happen.
- The full workflow has six stages: file management → stitching → editing and reframing → spatial audio → nadir patching → export with VR metadata.
- Exporting without VR metadata is one of the most common errors — platforms treat the file as flat video, not interactive 360 content.
- Standard editing transitions, warp stabilizers, and flat-video effects don't work correctly with equirectangular footage.
- High-stakes 360 productions benefit from professional post teams who can catch stitching errors, fix spatial audio sync, and deliver platform-ready files on deadline.
What Is 360 Video Post-Production?
Unlike standard video, 360 footage arrives in pieces — one file per lens, no native sphere in sight. 360 video post-production is the complete set of technical and creative processes that transforms those raw, multi-lens clips into a polished, platform-ready immersive video. The output is a file that YouTube, Facebook, and VR platforms recognize as interactive 360 content — where viewers can pan, rotate, and explore the full spherical environment.
The process is designed to achieve several things simultaneously:
- Merge overlapping lens perspectives into a single seamless sphere
- Correct exposure and color differences between lenses
- Add spatial audio that matches the viewer's orientation
- Clean up the bottom of the frame where the camera rig is visible
- Export with the correct projection format and metadata flags
How It Differs from Standard Video Editing
The most important distinction is that 360 footage cannot be edited until it's stitched. Raw files from multi-lens rigs are separate per-lens clips — they have no native "360" view until stitching software combines them into an equirectangular projection.
Apple describes the equirectangular format as a panoramic sphere represented as a 2D rectangle — a flattened map of the full spherical environment. Every subsequent editing, color, and audio decision happens within this projection.
That changes editorial logic fundamentally. Editors no longer frame shots — they manage where a viewer's attention is likely to land. Cuts and crossfades remain the standard transition tools, but the spatial context behind every decision is entirely different.
How the Complete 360 Video Post-Production Workflow Works
The six stages below run sequentially. Errors introduced early — particularly in stitching — can't be patched at the export stage.
Step 1: File Management and Organization
Multi-lens 360 cameras generate more files than most editors expect. An Insta360 Pro 2 stores footage across six microSD cards, each holding a separate high-resolution file (origin_*.mp4) for its corresponding lens.
The recording folder also contains low-resolution proxies, a preview file, a project file, and gyro data. All of these files must be present for stitching to work.
GoPro MAX files work differently: footage shot in 360 mode creates .360 proprietary files that must be processed through GoPro Player or Quik before they can be used in any other editing application.
Before touching any files:
- Verify every lens file is accounted for
- Check for dropped frames or corrupted clips
- Create a full backup of the original camera folder structure before processing begins
- Keep folder paths and filenames intact — some software (like Insta360 Studio) breaks if project files are renamed or moved
Step 2: Stitching and Equirectangular Formatting
Stitching combines the separate lens files into one equirectangular video. This is where the spherical image is actually assembled, and where quality decisions have the largest downstream impact.
Current stitching tools include:
- Mistika VR (SGO) — professional tool with optical flow technology, 70+ camera presets, Color Match, and VR preview without rendering; available in Personal and Professional plans
- Camera-native software — Insta360 Stitcher, GoPro Player, Kandao Studio, each tied to specific camera systems
- Autopano Video Pro — discontinued; GoPro closed Kolor and existing products are no longer updated
Stitching mode matters. Insta360 Stitcher offers three modes: new optical flow (nearly 3x faster than basic optical flow, but less effective in some scenes), basic optical flow, and scene-specific template (fastest, but limited when subjects are close to the camera or there's significant parallax error).
Monoscopic vs. stereoscopic stitching:
| Type | Output | Complexity |
|---|---|---|
| Monoscopic | Single spherical render, same for both eyes | Standard workflow |
| Stereoscopic | Separate left/right eye renders (over/under or side-by-side) | Roughly double the processing time; gyro stabilization not supported during 3D stitching |

Stereoscopic projects should be scoped separately from mono — they require tighter alignment tolerances and roughly double the render and review time.
Step 3: Editing, Reframing, and Color Correction
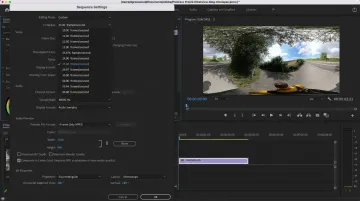
Once you have an equirectangular master, editing happens in a VR-aware NLE. The sequence must be configured for equirectangular VR projection before editing begins. Two common options:
- Adobe Premiere Pro (updated March 2026) — supports 360 viewing, trimming, VR property assignment, three-axis rotation, 360 panning, and ambisonic audio monitoring
- Final Cut Pro — supports equirectangular import, editing, and VR headset preview
Reframing is how editors direct viewer attention in 360. Since the camera captures everything, editors set a starting orientation — the "center point" the viewer faces when the scene begins — using offset effects or keyframes (the 360 equivalent of framing a standard shot).
For transitions, stick to cuts and crossfades. Adobe provides VR-specific effects including VR Blur, VR Chromatic Aberrations, VR De-Noise, VR Iris Wipe, and VR Spherical Blur — these are built for equirectangular footage. Standard push and wipe transitions are not designed for spherical projection.
Color correction must account for exposure inconsistencies between lenses, which are common when lighting changes across different parts of the scene. Tools like Mistika VR's Color Match feature and DaVinci Resolve's color pipeline are both used for this.
Step 4: Spatial Audio Post-Production
Standard stereo audio doesn't work in a 360 environment where the viewer can face any direction. Spatial — or ambisonic — audio encodes sound directionality across all three dimensions, so each sound source appears to come from the correct position in the sphere relative to where the viewer is looking.
YouTube supports First Order Ambisonics and First Order Ambisonics with Head-Locked Stereo for 360 and VR videos. The AmbiX/ACN/SN3D format is the standard, and YouTube requires the spatial media metadata tool to be applied before upload.
Current ambisonic tools include:
- SoundField by RØDE — ambisonic processor plugin in VST, AU, and AAX formats
- IEM Plug-in Suite — free, open-source ambisonic plugins up to 7th order
- Native ambisonic support in Adobe Premiere Pro (monitoring and export)
Note: The Facebook 360 Spatial Workstation was discontinued in May 2022 and is no longer available for download. It should not be referenced as a current tool.
Step 5: Nadir Patching and Visual Clean-Up
With audio handled, the next pass focuses on visual clean-up. The nadir — the bottom of the 360 sphere, directly below the camera — is visible in every 360 shoot, where the rig, tripod, or operator will appear. Nadir patching replaces this area with a clean graphic, blurred patch, or branded logo.
For corporate and branded deliverables, nadir patching is standard practice. A logo placed at the nadir is visible whenever a viewer looks down, making it a consistent brand touchpoint throughout the viewing experience.
Other clean-up tasks in this stage:
- Correcting stitching seam errors in high-motion areas or where subjects pass close to a lens boundary
- Removing equipment or crew members caught in the frame
- Applying stabilization — using VR-aware tools like Mistika VR's one-click stabilization or Mettle SkyBox Suite, not the standard Warp Stabilizer, which is not designed for equirectangular footage
Step 6: Export, Metadata Tagging, and Platform Publishing
A 360 video exported without VR metadata plays as a distorted flat file on every platform. Facebook explicitly states that 360 videos missing spherical metadata will be treated as standard videos. The same applies to YouTube.
Metadata can be injected two ways:
- Via NLE export settings — Adobe Premiere Pro includes a "Video Is VR" checkbox in export
- Manually using Google's Spatial Media Metadata Injector (v2.1, the current release)
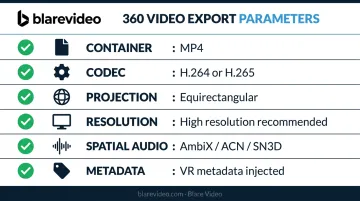
Core export parameters for 360 content:
- Container: MP4
- Codec: H.264 (broadest compatibility) or H.265 (better quality, smaller file, higher hardware requirements and less VR player support)
- Projection: Equirectangular monoscopic, or stereoscopic over/under for 3D
- Resolution: Significantly higher than standard video — because the full 360° sphere is encoded in one frame and the viewer only sees a portion of it at any time, lower resolutions look noticeably soft in headsets or on-screen; check YouTube's current upload specifications directly, as resolution and bitrate recommendations are updated periodically
- Spatial audio: Export with ambisonic metadata applied before upload
Key Factors That Affect 360 Post-Production Quality
Source Footage Quality
Post-production can refine footage, but it can't rescue bad capture. The quality of your stitched output depends on what was actually recorded: camera resolution, lens overlap consistency, lighting uniformity across lenses, and rig stability throughout the shoot.
A stationary rig on a stable surface stitches cleanly. A handheld rig with inconsistent lens overlap creates seam problems that require time-consuming manual correction.
Hardware Capacity
360 footage is computationally expensive. Stitching, rendering, and color grading at professional resolutions demands significant hardware. Kandao's guidance for Obsidian Pro material sets a useful benchmark:
- 32GB RAM minimum for multi-lens stitching workflows
- 24GB+ dedicated GPU memory for real-time preview and rendering
- Fast NVMe storage to prevent I/O bottlenecks during long render queues
Insufficient hardware creates problems at every stage — stitching previews lag, VR playback drops frames, and render queues stall. Hardware planning belongs at the start of the project, not after the footage arrives.
Software Compatibility
Not every NLE handles equirectangular footage natively, and not every effect works in a spherical context. Before starting any 360 project, verify that:
- Your NLE supports VR sequence settings and 360 preview
- Your stitching software is compatible with your specific camera system
- Your audio pipeline supports ambisonic export in the correct format (AmbiX/ACN/SN3D for YouTube)
- Any effects or plugins you plan to use are VR-compatible
Common Mistakes in 360 Post-Production
Four errors show up repeatedly in 360 post-production — and each one is preventable.
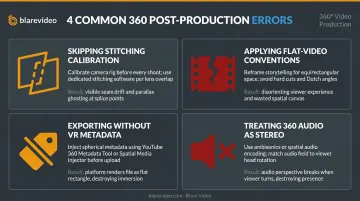
- Skipping stitching calibration. Auto-stitch handles static scenes reasonably well, but falls apart when subjects move through the stitch line or stand close to the camera. The result is parallax error: doubled edges, visible seams on moving subjects. Mistika VR's Edge Points feature and Insta360's optical flow modes exist specifically for this. Catching it at the stitching stage costs far less than discovering it at export.
- Applying flat-video editorial conventions. Jump cuts without reorienting the viewer, text overlays that ignore gaze direction, effects built for rectilinear footage — all of these break immersion or distort in equirectangular projection. Every editorial decision needs to be evaluated from the viewer's perspective, not the editor's timeline.
- Exporting without VR metadata. This is avoidable. It still happens. The output looks fine on a standard monitor and fails completely on the target platform. Add metadata verification to your export QA checklist.
- Treating 360 audio as stereo. Skip the ambisonic encode and the sound environment won't match viewer orientation. When someone turns toward a speaker and the audio doesn't follow, the immersion collapses. Platforms support spatial audio — there's no reason not to use it.
When to Hire a Professional 360 Video Production Team
Some 360 projects are manageable in-house with the right software and hardware. Others aren't. The clearest signals that professional post-production is the right call:
- Corporate events where brand standards are non-negotiable and footage quality reflects directly on the organization
- Real estate and architectural walkthroughs that require precise stitching, consistent color grading across scenes, and clean nadir patching for every shot
- VR training or educational experiences with multi-scene workflows, interactive elements, or publishing requirements across multiple platforms or headset formats
- Any project where errors discovered late — a stitching problem found at export, missing metadata on delivery day — would be too costly to fix under deadline
What in-house teams most commonly underestimate: the hardware cost of stitching and rendering at professional resolutions, the learning curve for equirectangular editing conventions, and the compounding cost of mistakes caught late. A stitching problem that's a 15-minute fix at the stitching stage can mean hours of rework if it surfaces during client review.
Full-service production companies like Blare Video manage video production for corporate clients — from shoot coordination across multiple cities to post-production and final delivery. For organizations that need broadcast-quality video without managing a specialized technical workflow internally, that full-service model means no internal team needs to own the technical complexity. Blare Video offers a free consultation to scope your project before any commitment.
Frequently Asked Questions
What software is commonly used for 360 video post-production?
Professional workflows draw from three categories: stitching software (Mistika VR, Insta360 Stitcher, GoPro Player), NLEs with 360-aware settings (Adobe Premiere Pro, Final Cut Pro, DaVinci Resolve), and ambisonic audio tools (SoundField by RØDE, IEM Plug-in Suite). Most productions use tools from at least two of these categories across the full pipeline.
Do I need to stitch 360 footage before editing it?
Yes — for multi-lens rigs, stitching is a prerequisite. Raw files are separate per-lens clips with no usable 360 view until merged. Some consumer single-body cameras (like certain Insta360 consumer models) auto-stitch on the device, which simplifies the workflow, but professional multi-lens systems always require a dedicated stitching stage.
What is nadir patching and why is it important?
The nadir is the bottom of the 360 sphere, where the camera rig is always visible. Nadir patching replaces that area with a clean graphic, blurred patch, or branded logo. For corporate deliverables, it's standard — having the camera tripod visible throughout a branded experience is not an acceptable finish.
What are the correct export settings for 360 video on YouTube?
YouTube 360 requires equirectangular projection, H.264 or H.265 codec, and VR metadata embedded in the file — either through your NLE's export settings or Google's Spatial Media Metadata Injector. For current resolution and bitrate specifications, check YouTube's upload encoding recommendations directly, as these are updated periodically.
How is 360 video post-production different from standard video editing?
Three core differences: stitching is required before any editing can happen (no parallel in flat video), editorial decisions shift from framing to managing viewer orientation, and the technical environment — equirectangular projection, VR-compatible effects, ambisonic audio, and metadata-tagged export — is fundamentally different from a standard video pipeline.
How long does 360 video post-production typically take?
Timelines depend on footage volume, resolution, scene count, and whether the project includes stitching, spatial audio, nadir patching, or interactive elements — high-resolution renders alone can add hours per scene. Scope each project individually before committing to a delivery date.